
- You are here:
- Home »
- Documentation
Documentation
If there is anything missing from the documentation or you have a general question, please ask in the Facebook Group, which is available to all InvoiceSync users.
Getting Started
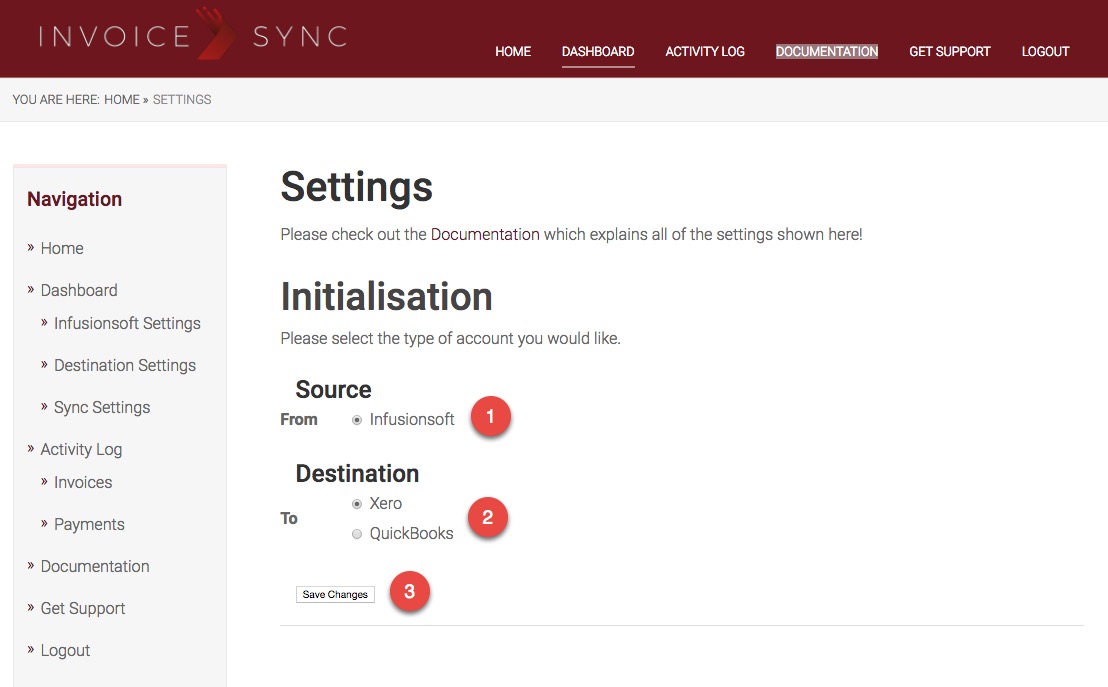
When you first log in and go to the Settings page, you’ll be asked to select the following:
Source: Infusionsoft is currently the only option
Destination: Select Xero or QuickBooks Online
Click Save Changes
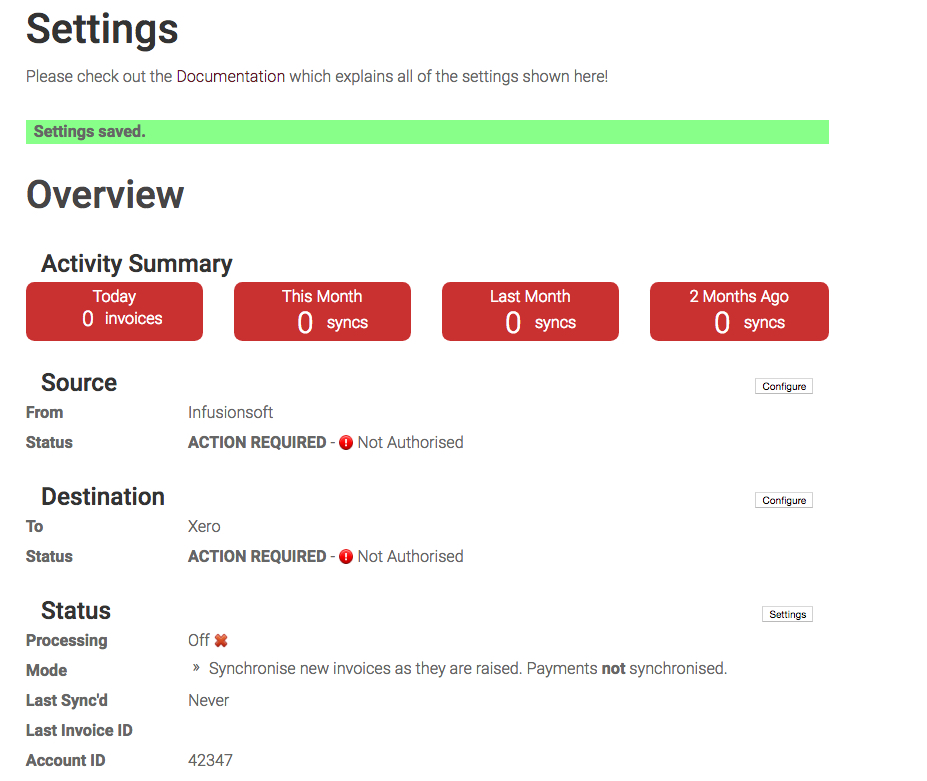
Note: Once you’ve selected your destination, this page will not appear again and the regular Setting page will be displayed instead. Until you’ve authorised Infusionsoft and either Xero or QuickBooks Online, the page will look like this:
NOTE: Infusionsoft has recently rebranded to Keap. Please disregard any remaining references to Infusionsoft in screenshots and videos; nothing apart from the name has changed.
Go to the Settings -> Source (Infusionsoft) Settings menu option.
Then click on the “Click here to authorise Infusionsoft” link.
If you’re not already signed into Keap, the standard Keap login screen will appear – you’ll need to enter your Keap ID and password.
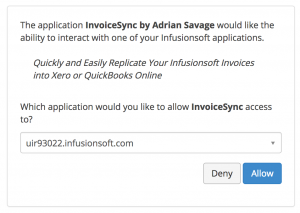
This is straightforward and simply involves you logging into Keap in a pop-up window if you’re not already connected, then selecting your Keap account (for most people, only one account will be listed, but some people have access to more than one Keap account). Select the appropriate account once logged in and click Allow.
You’ll then see an authorisation screen where you’ll be asked to select your Keap app and grant authorisation for InvoiceSync to connect.
(right now, you’ll need to close the authorisation tab when complete and then refresh the Settings screen that you go back to).
You can watch a video on connecting Keap here:
Once you’ve refreshed the Settings screen, you must confirm the currency that your Keap application is using, and select the appropriate option for Tax Handling and Finance Charges, then click the Save Changes button.
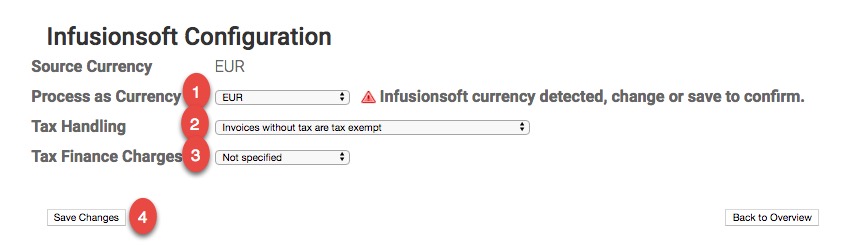
- As Keap only supports one currency, InvoiceSync also supports only one currency. We automatically detect the currency you have set up in Keap. If the currency selected is correct, you can simply click save. If you with to use a different currency, select the currency from the dropdown (we currently support AUD, EUR, GBP, NZD and USD).
- Tax Handling: You will be presented with three options here:
- Invoices without tax are tax exempt. – Choose this option if you don’t want Xero/QBO to add or include tax if Keap invoices don’t include tax. You would usually choose this if you’re selling internationally and only customers in certain countries have to pay tax.
- Invoices without tax are tax inclusive. – Choose this option if you want your tax-exclusive Keap invoices to show the tax element in Xero/QBO. E.g. if your country’s tax rate is 20%, you use tax inclusive prices in Keap and you sell a product or service for $100 plus tax, the amount in Keap would be $120 and in Xero/QBO, it would show as $120, incl. $20 tax.
- Invoices without tax are tax exclusive. – Choose this option if you want Xero/QBO to add the tax. E.g. if you charge tax for some products/services or depending on the customer’s country, but not others. In this case, if the Keap invoice includes tax, i.e. you have your tax tables set up in Keap and your products/services set to charge tax, a product that has tax in Keap would also have tax in Xero/QBO. E.g. $100 plus $20 tax in Keap would show as $100 plus $20 tax in Xero/QBO. However, if the product was $100 in Keap with no tax, it would still show as $100 plus $20 tax in Xero/QBO as well.
- Tax Finance Charges – Choose no if you don’t charge tax on payment plans or yes if you do.
Setting Up Xero
Click on destination settings, then change the url in the browser bar to https://invoicesync.net/settings/?tab=dest&auth=2 and hit enter. This will open a pop-up window that will prompt you to log into your Xero account. You will need to choose the company you want to link to (in most cases, this will only be one company), then authorise InvoiceSync to connect to Xero.
Setting Up InvoiceSync
Back in InvoiceSync, Go to the Settings -> Destination Settings menu option.
- Select the default Account Code that you’ll want all invoice line items to be recorded against. In most cases, this will be 200.
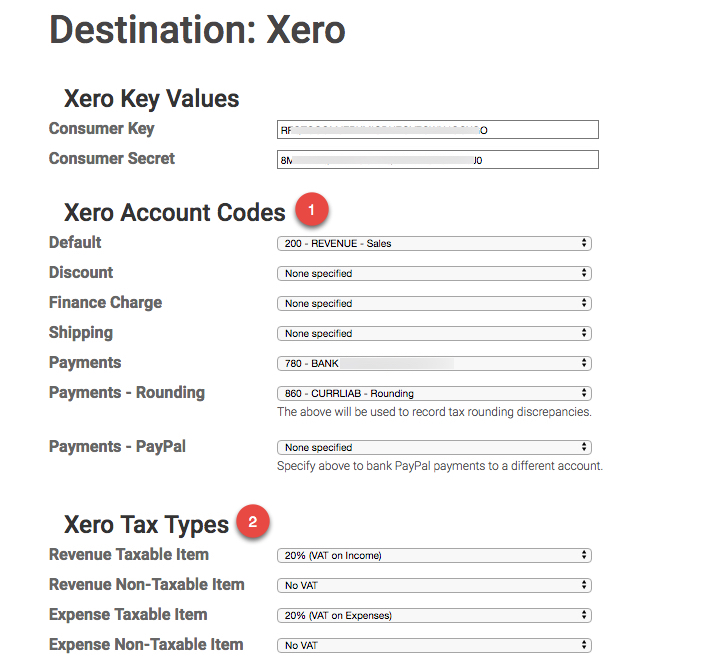
Optionally, you can specify different account codes for discounts, finance charges and shipping charges. If you leave them blank, those line items will also be recorded against your default Account Code. - Next, select the tax code to use when applying sales tax to taxable invoices. This is taken directly from your Xero application.Then, select the tax code to use that signifies zero sales tax, which is applied to line items that do not incur sales tax. Again, this is taken directly from your Xero application.
- Finally, select the status that all new invoices will be created with – either Draft, Submitted or Authorised. Beware – if you select Authorised, it will not be possible to amend or delete the invoices that InvoiceSync creates, you will only be able to void them.
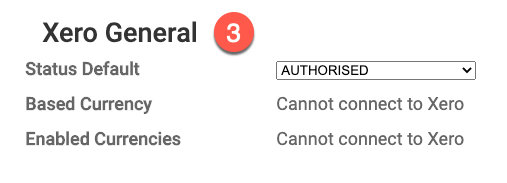
We highly recommend you set the status to DRAFT to start with and then create at least one, possibly more, test invoices in Infusionsoft and sync these over manually. This is covered in more detail under 5. What Happens Next?
Finally, click Save Changes.
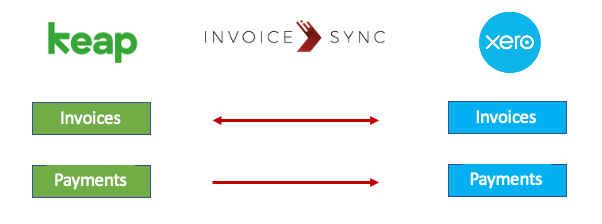
This diagram shows how the data is synchronised between Keap and Xero.
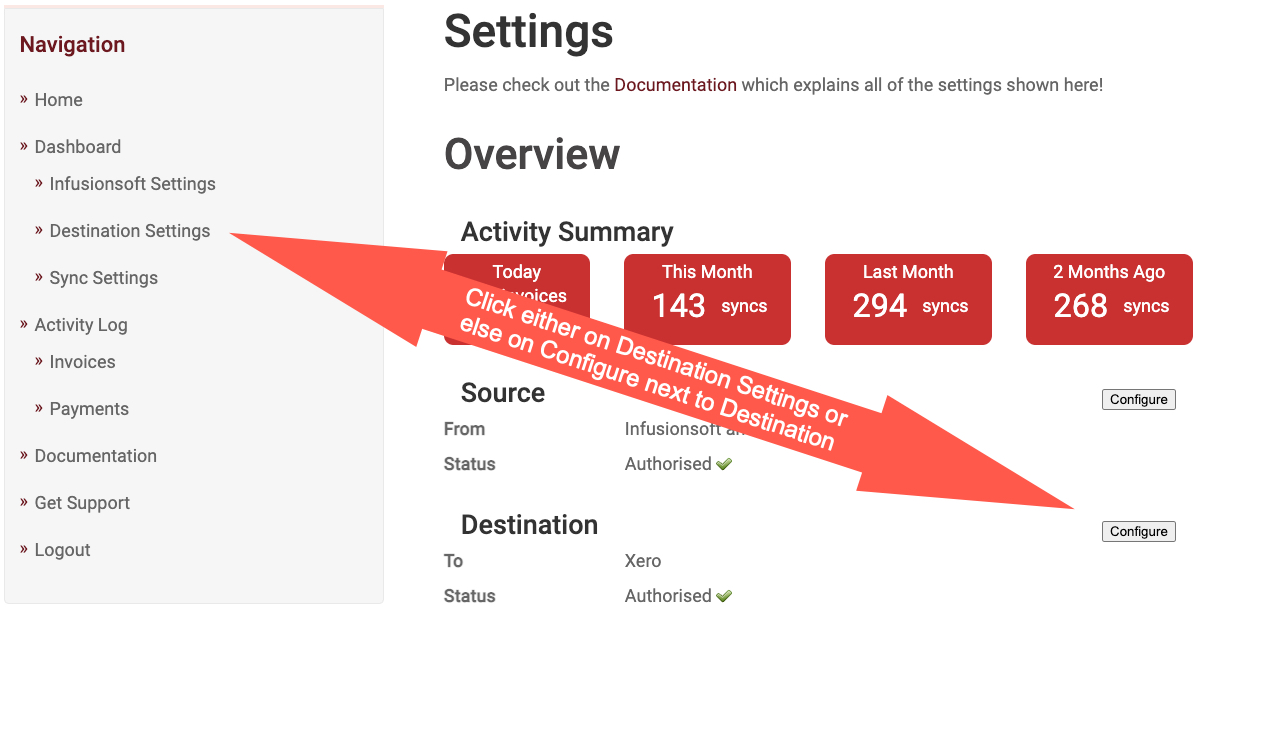
Once you’re logged in, you will be presented with a Settings page asking you to select your Source (Keap) and Destination (Xero). As we only support Keap as the Source, this is selected and cannot be changed. As we support both Xero and QuickBooks Online (QBO) as sources, you will need to select Xero (selected by default) and then click Save Changes.
The next page will present you with ACTION REQUIRED for both Keap and Xero. Click on Configure next to each in turn.
- Connect your Keap account – this is straightforward and is documented (with screenshots and a video) in Section 2
- Next, you will need to connect to Xero.
This is very similar to how you connect to Keap and you can
view full instructions here. - Next, you will need to select your Synchronisation mode.
There are 4 options to choose from (these are for syncing FROM Keap TO Xero):
- Synchronise new invoices as they are raised. Payments not synchronised. – This option will only synchronise invoices every 30 minutes, but not payments.
- Synchronise new invoices as they are raised with associated payments as they are received. – This option will synchronise ALL invoices, both paid and unpaid, as they are created (every 30 minutes, so not quite as they are created) and associated payments when they are received. This means unpaid invoices will show in Xero.
- Synchronise invoices with their associated payments but only when payment is received. – This option will ignore unpaid invoices and only sync paid invoices, i.e. only paid invoices will show in Xero, unpaid ones will not.
- No forward synchronisation. – If you only want to sync FROM Xero TO Keap, but not the other way round, please select this option. Please note that we can only sync invoices from Xero to Keap, NOT payments.
- You have 3 options for when you want to start synchronisation from (this is for Keap to Xero only, not the other way round:
- The beginning, starting from the first invoice. – This will look for the first invoice ever raised and start syncing from this invoice.
- Invoice ID: – You can select a specific invoice ID to start syncing from. Please note that the invoice ID in Keap can sometimes be different to the order ID.
- Invoice Date: – If you select this option, we will look for the first invoice created on this date and start syncing from that date.
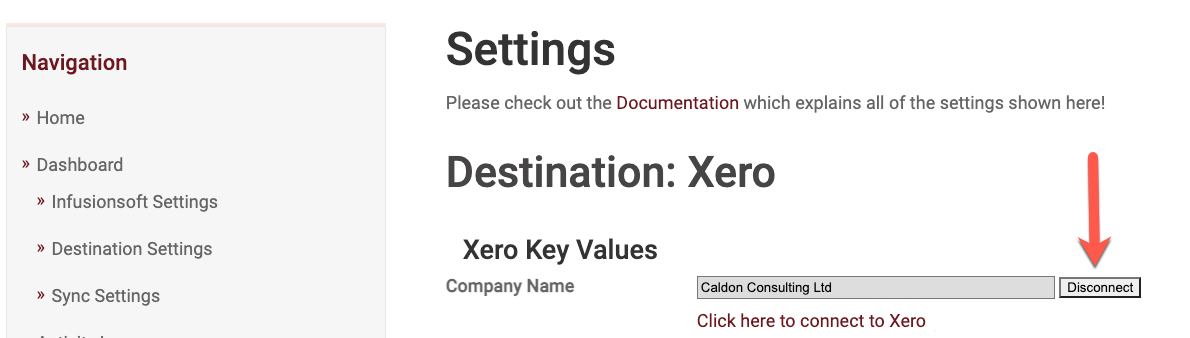
- How do I disconnect from Xero?
-
-
- Go to Destination Settings on the Dashboard
-
-
-
- Click on Disconnect next to your company name under Xero Key Values
- Click on Disconnect next to your company name under Xero Key Values
-
- What doesn’t the integration do?
-
-
- We only sync invoices from FROM Xero to Keap but not payments.
- We don’t handle credits or refunds.
-
- When and how does data sync occur?
-
- Data is synced automatically every 30 minutes on the hour and half past the hour.
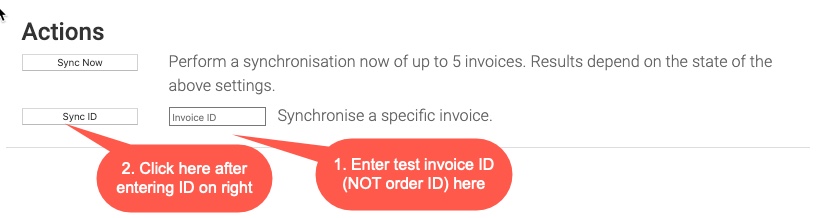
- You also have the ability to sync up to 5 invoices and 15 payments between those times by clicking Sync Now at the bottom of the Dashboard. We highly advise against doing this within 5 minutes either side of a scheduled sync, as this can interfere with the scheduled sync.
You can also manually sync individual invoices only (not payments) FROM Keap to Xero (not the other way round) using the Sync ID function at the bottom of the Dashboard. This is one invoice at a time and should only be used if an invoice was previously skipped and the reason for the skip subsequently resolved.
This is very straightforward.
Go to the Settings -> Destination Settings menu option (or on the Dashboard, click on Configure next to QuickBooks).
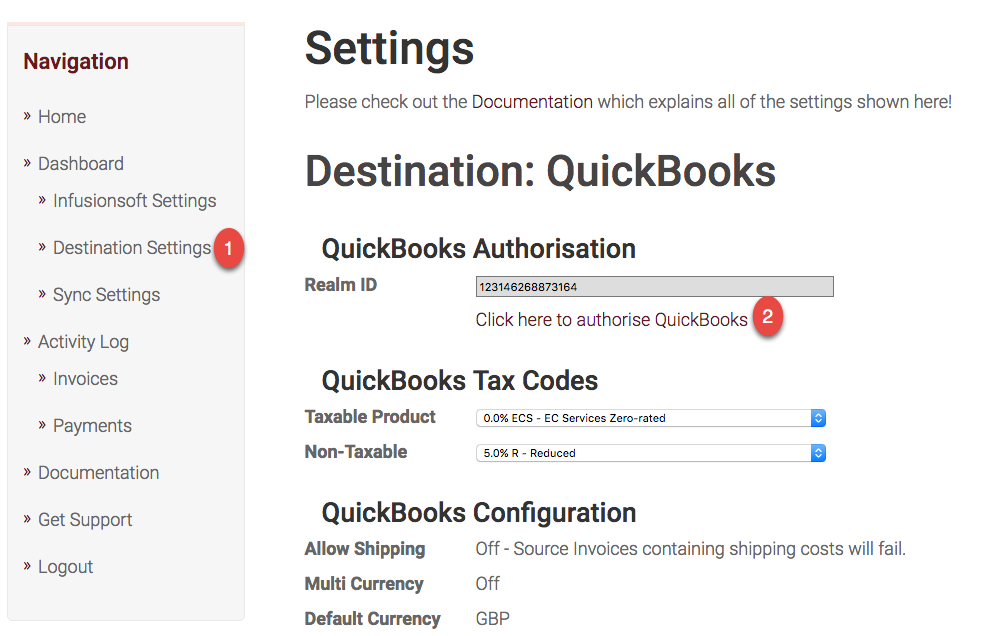
Then click on the “Click here to authorise QuickBooks” link.
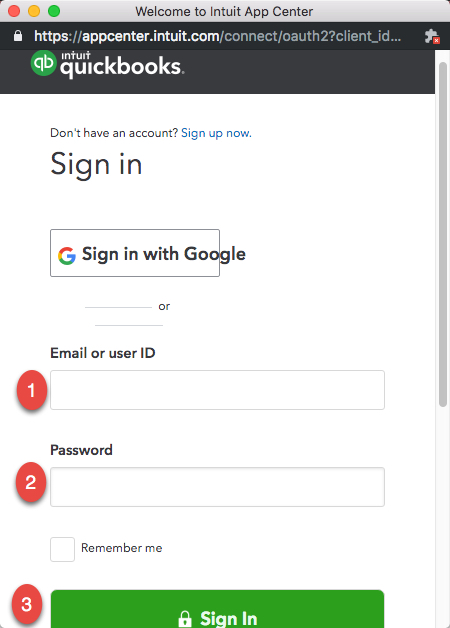
If you’re not already signed into QBO, the standard QBO login screen will appear – you’ll need to enter your QBO ID and password.
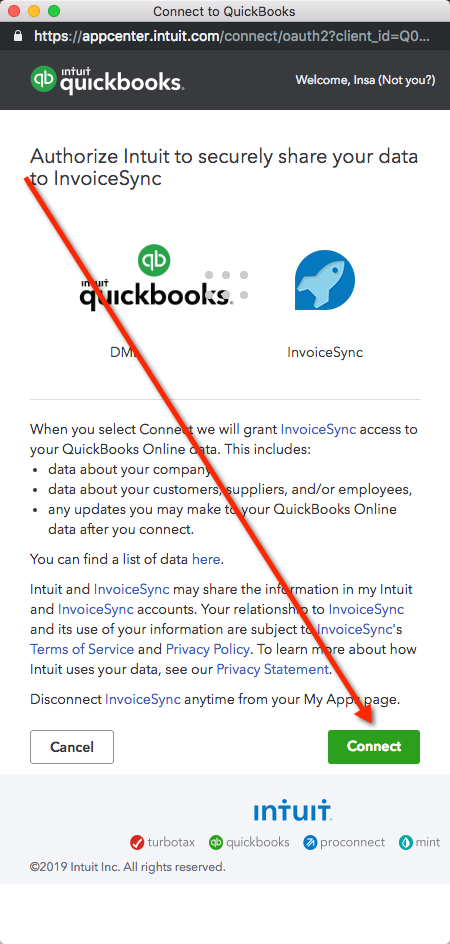
You’ll then see an authorisation screen showing your QuickBooks organisation name and InvoiceSync. If it’s the correct organisation name, scroll down to the bottom and click the green Connect button.
You should get a message saying Quickbook Authorisation and below that, Success.
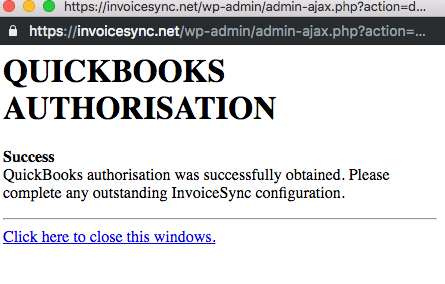
(right now, you’ll need to close the authorisation tab when complete).
You can watch a video on connecting QBO by clicking here.
Once that’s done, you need to select the appropriate Taxable Product and Non-Taxable options, then click the Save Changes button.
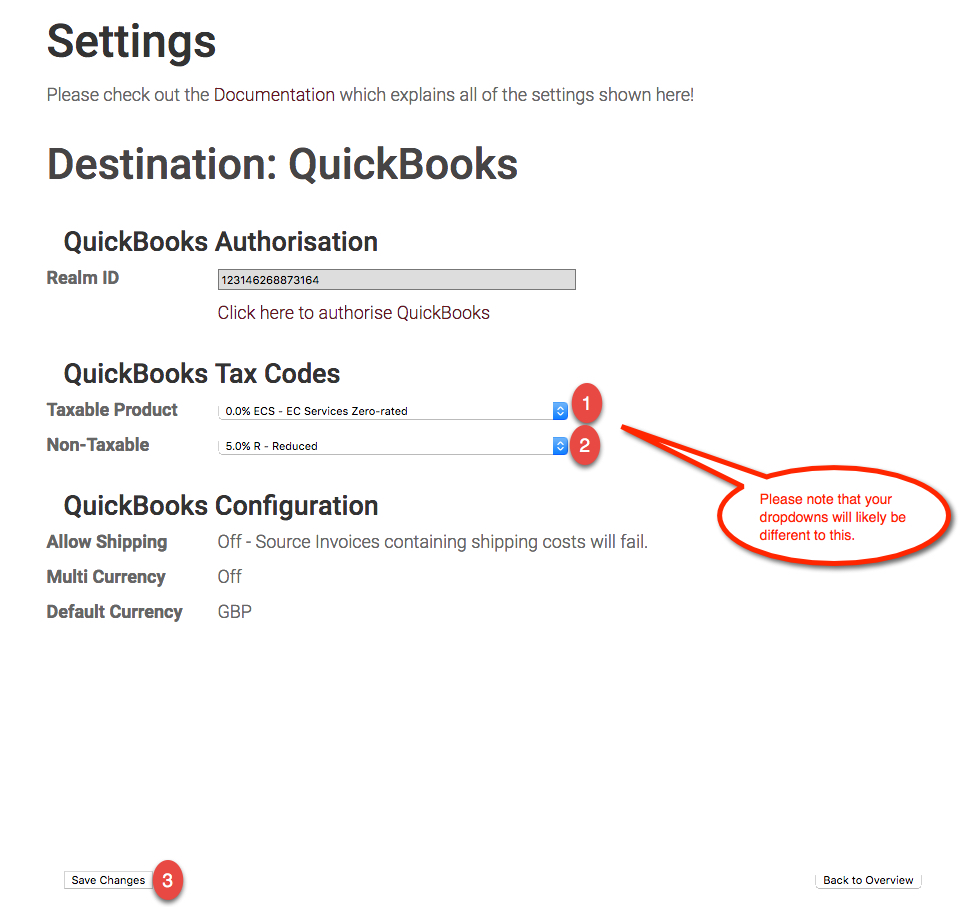
If you would like to match the Infusionsoft SKU code to the QBO Product ItemRef, please send an email to support@invoicesync.net asking for this to be switched on
Go to the Settings -> Sync Settings menu option.
If you’ve not configured this already, you’ll see the First-Time Settings screen.
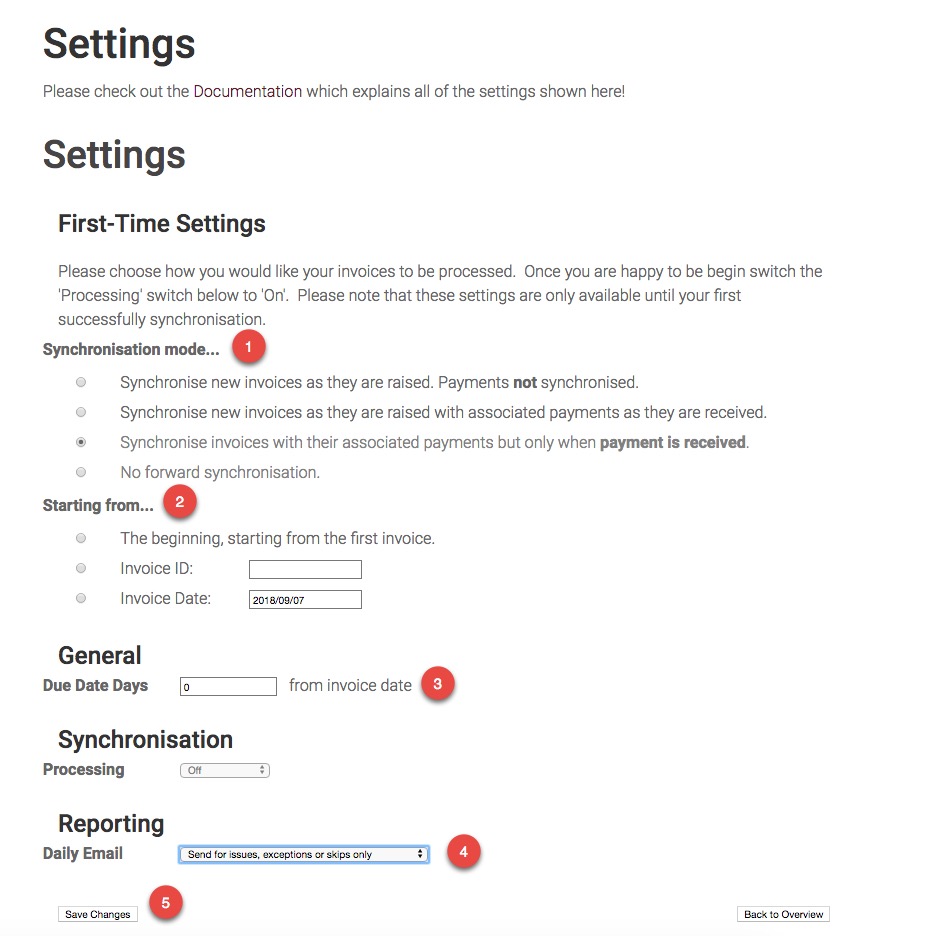
- Select whether to synchronise just invoices or payments as well and if the latter, whether to synchronise invoices as they are raised or only when payment is received.
- Select when you want synchronisation to start from. All invoices newer than the selected invoice or date will then be synchronised automatically – so you can synchronise historical data if you want. You can choose to go right back to the first ever invoice, or select an invoice ID, or invoice date.
- Select the number of days that will be added onto the invoice date when creating a Due Date for the invoice.
- Select whether to receive a daily email or only receive an email for issues, exceptions or skips. We would recommend the latter.
You must click the Save Changes button at this point before you can enable synchronisation.
At this point, it is HIGHLY recommended that you create at least one test invoice in Infusionsoft and sync it to Xero or QuickBooks Online BEFORE switching processing on. To do this, create the invoice in Infusionsoft, make a note of the invoice number (which is usually the same as the order number but can sometimes be different), then go to the InvoiceSync Dashboard, enter the number in the field at the bottom left and click on Sync ID.
Check that the invoice is appearing in your accounting system the way you would expect. Once you’re happy with the way the invoices appear in your accounting system, you can switch on processing. For Xero, you will want to change the invoice status to Authorized (unless you have a good reason not to) under Destination Settings, as you will otherwise need to manually mark invoices as approved in Xero. This does not apply to QBO.
Finally, switch on Processing and click the Save Changes button again. Synchronisation will then begin automatically.
Once everything is set up and Synchronisation Processing is turned ON, InvoiceSync will connect to your Infusionsoft account once an hour, download the new invoices, and replicate them into Xero or QuickBooks Online.
So every time a new invoice gets created in Infusionsoft, a matching invoice with the same line items, discounts, sales tax, etc., will be created in Xero/QBO within an hour.
You can check what’s happened recently by going to the Activity Log page in your account.
Invoice Dates
Invoice dates will be set as follows:
- The invoice date will match the invoice date in Infusionsoft.
- If the invoice was paid at the time of creation (e.g. an online order paid by credit card), the due date of the invoice will be set to the invoice date.
- If the invoice contains a payment plan, the due date of the invoice will be set to the final date of the payment plan.
- Otherwise, the due date of the invoice will be set to X days after the invoice date, according to the configuration you have chosen in InvoiceSync.
Xero Account Codes
Invoice line items will be set to use the default account code you specified in the settings, unless you have created products in Xero that match products that exist in Infusionsoft. The SKU code is used to match products, and where a matching product is found, the invoice line items will use the account code as specified in the Xero product. Please note that SKU matching is something that will need to be switched on by our team, so if you’d like to use this feature, please send an email to support@invoicesync.net asking for this to be switched on
Other Functionality
There are also a few options that are not user-configurable but that you can request by emailing support@invoicesync.net and stating which one(s) you would like.
They are as follows:
- Skip invoice if already synced
- Skip payment if it results in overpayment (e.g. for credits, refunds, etc.)
- Skip invoice if total amount due is zero
If you have more than one Sales Account code and want your Xero invoices to automatically use the correct account code for each item, InvoiceSync can do this. Simply match the product’s SKU code in Keap to the item code in Xero.
E.g. SKU code in Keap: TIL
Item code in Xero: TIL
Below are some examples:
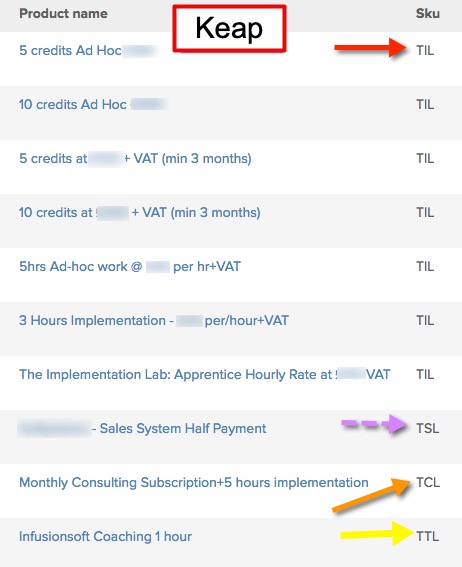
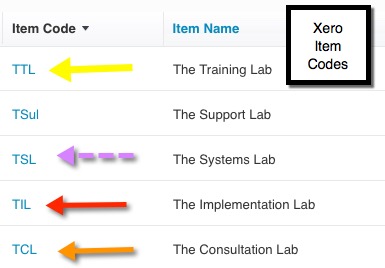
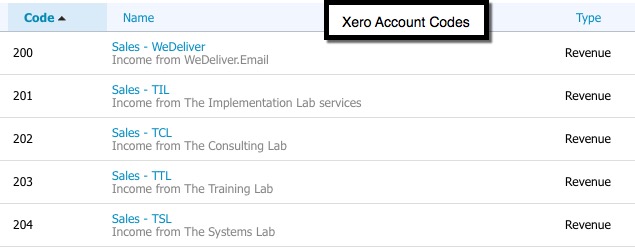
Please note that more than one product in Keap can have the same SKU code. This will NOT use the Xero Item code or the item’s description, it will purely use that item’s account code, in our example 201 – The Implementation Lab for item code TIL.
The product description in Xero will be the Keap Product Name.
If you would like the Xero Item Code to be populated as well based on the Keap SKU code, please send an email to support@invoicesync.net asking us to switch this on for you.
If you would like to sync from your accounting system to Infusionsoft as well as the other way, please send an email to support@invoicesync.net, stating the email address you use to log into InvoiceSync with and the date you want ReverseSync to start from.