
- You are here:
- Home »
- 2. Connecting to Your Keap (formerly Infusionsoft) App
2. Connecting to Your Keap (formerly Infusionsoft) App
NOTE: Infusionsoft has recently rebranded to Keap. Please disregard any remaining references to Infusionsoft in screenshots and videos; nothing apart from the name has changed.
Go to the Settings -> Source (Infusionsoft) Settings menu option.
Then click on the “Click here to authorise Infusionsoft” link.
If you’re not already signed into Keap, the standard Keap login screen will appear – you’ll need to enter your Keap ID and password.
This is straightforward and simply involves you logging into Keap in a pop-up window if you’re not already connected, then selecting your Keap account (for most people, only one account will be listed, but some people have access to more than one Keap account). Select the appropriate account once logged in and click Allow.
You’ll then see an authorisation screen where you’ll be asked to select your Keap app and grant authorisation for InvoiceSync to connect.
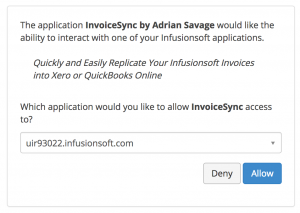
(right now, you’ll need to close the authorisation tab when complete and then refresh the Settings screen that you go back to).
You can watch a video on connecting Keap here:
Once you’ve refreshed the Settings screen, you must confirm the currency that your Keap application is using, and select the appropriate option for Tax Handling and Finance Charges, then click the Save Changes button.
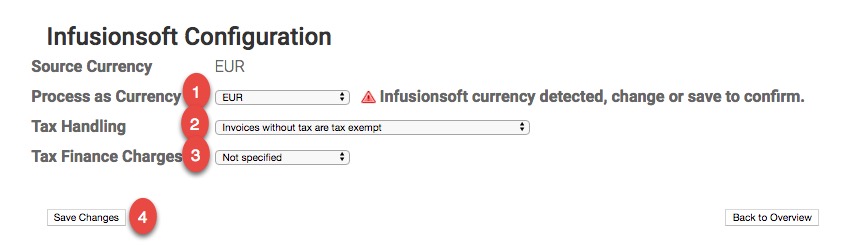
- As Keap only supports one currency, InvoiceSync also supports only one currency. We automatically detect the currency you have set up in Keap. If the currency selected is correct, you can simply click save. If you with to use a different currency, select the currency from the dropdown (we currently support AUD, EUR, GBP, NZD and USD).
- Tax Handling: You will be presented with three options here:
- Invoices without tax are tax exempt. – Choose this option if you don’t want Xero/QBO to add or include tax if Keap invoices don’t include tax. You would usually choose this if you’re selling internationally and only customers in certain countries have to pay tax.
- Invoices without tax are tax inclusive. – Choose this option if you want your tax-exclusive Keap invoices to show the tax element in Xero/QBO. E.g. if your country’s tax rate is 20%, you use tax inclusive prices in Keap and you sell a product or service for $100 plus tax, the amount in Keap would be $120 and in Xero/QBO, it would show as $120, incl. $20 tax.
- Invoices without tax are tax exclusive. – Choose this option if you want Xero/QBO to add the tax. E.g. if you charge tax for some products/services or depending on the customer’s country, but not others. In this case, if the Keap invoice includes tax, i.e. you have your tax tables set up in Keap and your products/services set to charge tax, a product that has tax in Keap would also have tax in Xero/QBO. E.g. $100 plus $20 tax in Keap would show as $100 plus $20 tax in Xero/QBO. However, if the product was $100 in Keap with no tax, it would still show as $100 plus $20 tax in Xero/QBO as well.
- Tax Finance Charges – Choose no if you don’t charge tax on payment plans or yes if you do.